When we think of ways to upgrade our bikes, most of us think of components that will make our bikes look more pro. While there is no denying the appeal of a set of deeper wheels or a fancy stem, investing that same amount in smaller parts can often yield a greater return in terms of ride quality.
One area that’s often overlooked, especially by road riders who are more accustomed to rim brakes, is disc rotors. If you have them at all, you probably have the ones that came stock with your bike. But when the time comes to replace or upgrade them, this guide will help you select the rotor that’s right for you.
Much like disc brake pads, the major limiter on braking performance for rotors is heat. Just like pads, the rotors turn speed into heat, and the faster they shed that heat the more speed you can scrub. Advanced materials, larger rotors, and special surface treatments all allow that heat to be shed more quickly, but this comes at a cost. The major factors you will have to evaluate when you buy a new set of rotors are size, material, shape, and mounting standard.
As with most bike parts, you’ll have to balance cost, performance, longevity, and weight concerns when deciding what rotor is for you. You’ll also need to check your rotors and pads are compatible if you plan to use metallic pads. Read more about brake pads.
[button]Shop brake rotors[/button]
Mounting standards for disc brake rotors
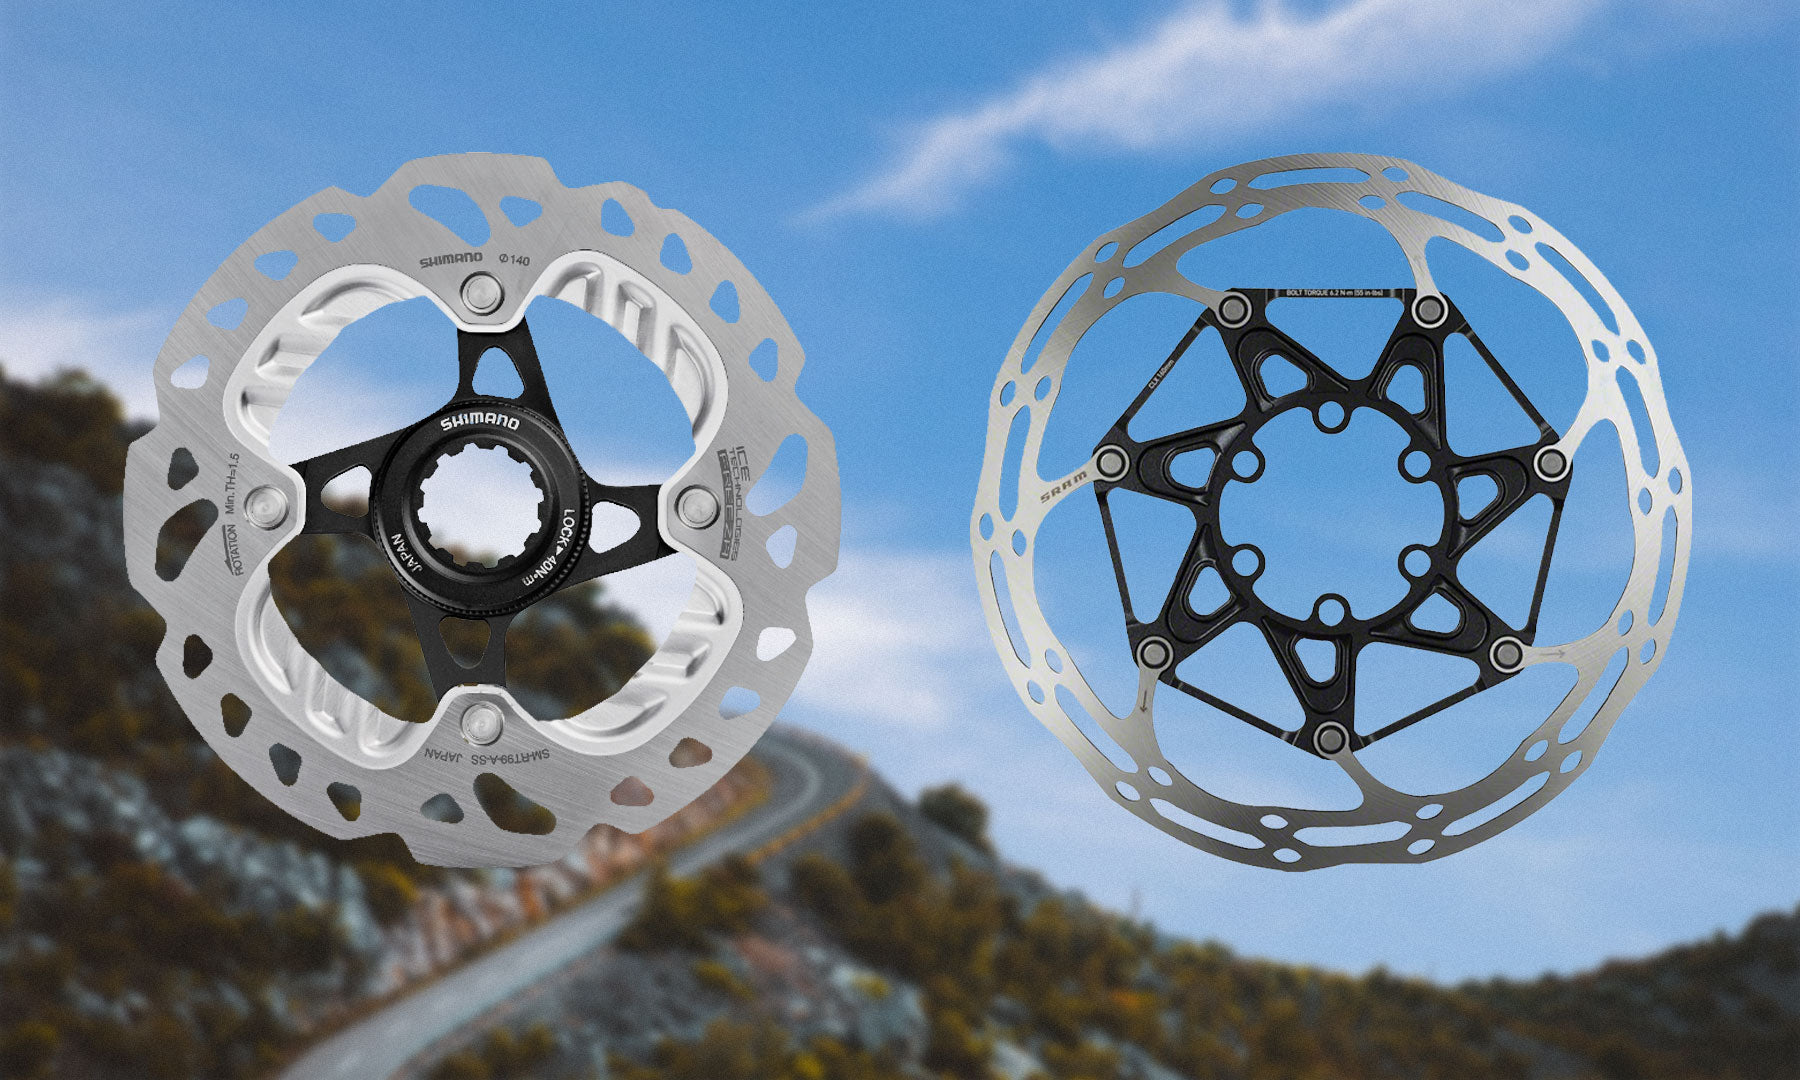
Your hubs will dictate which type of rotor you need. Most new hubs now use the Centerlock standard, which makes mounting rotors much easier than the six-bolt standard. You can buy an adaptor to run Centerlock rotors on six-bolt hubs, but that adds more weight and complexity. Either standard works once your wheels are set up, but Centerlock is considerably easier for riders who travel a lot and remove the rotors when they fly.
Some brands only offer six-bolt rotors, while SRAM and Shimano have options for both standards, Campagnolo appears to only have Centerlock. In order to change Centerlock rotors, you will need to loosen and tighten the lockring with either a bottom bracket tool or a cassette tool. As you'll see, lockrings that fit a bottom bracket tool have large external splines, while those with internal splines fit a cassette tool. Six-bolt rotors, on the other hand, require a Torx T-25 wrench for installation.
[newsletter]
Brake rotor size
Nick Murdick, mountain bike product manager for Shimano, explained that “Riders looking for more stopping power can look to larger rotors as an option for this added power. Heavier riders, heavier bikes, or riders who push the limits on descents and need that extra power could go for bigger rotors.”
However, a larger rotor will come with a weight penalty, and will likely require new mounting adapters for your brake calipers. On some frames, changing rotor size might not be an option, but many modern road and gravel frames that use flat mount brakes offer a reversible mount that allows riders to switch between 140mm and 160mm rotors if they feel the need. If you’re not sure that your frame can accommodate larger rotors, ask your mechanic or the frame manufacturer.
In general, most riders will stick with their stock rotor sizing and look at improved rotor and pad materials if they want a little more power or heat management. Note that your rotors might not be the same size. Many road bikes come with a 140mm rear rotor and a 160mm front rotor as standard. Mountain bikes also tend to run larger front rotors for greater braking power.

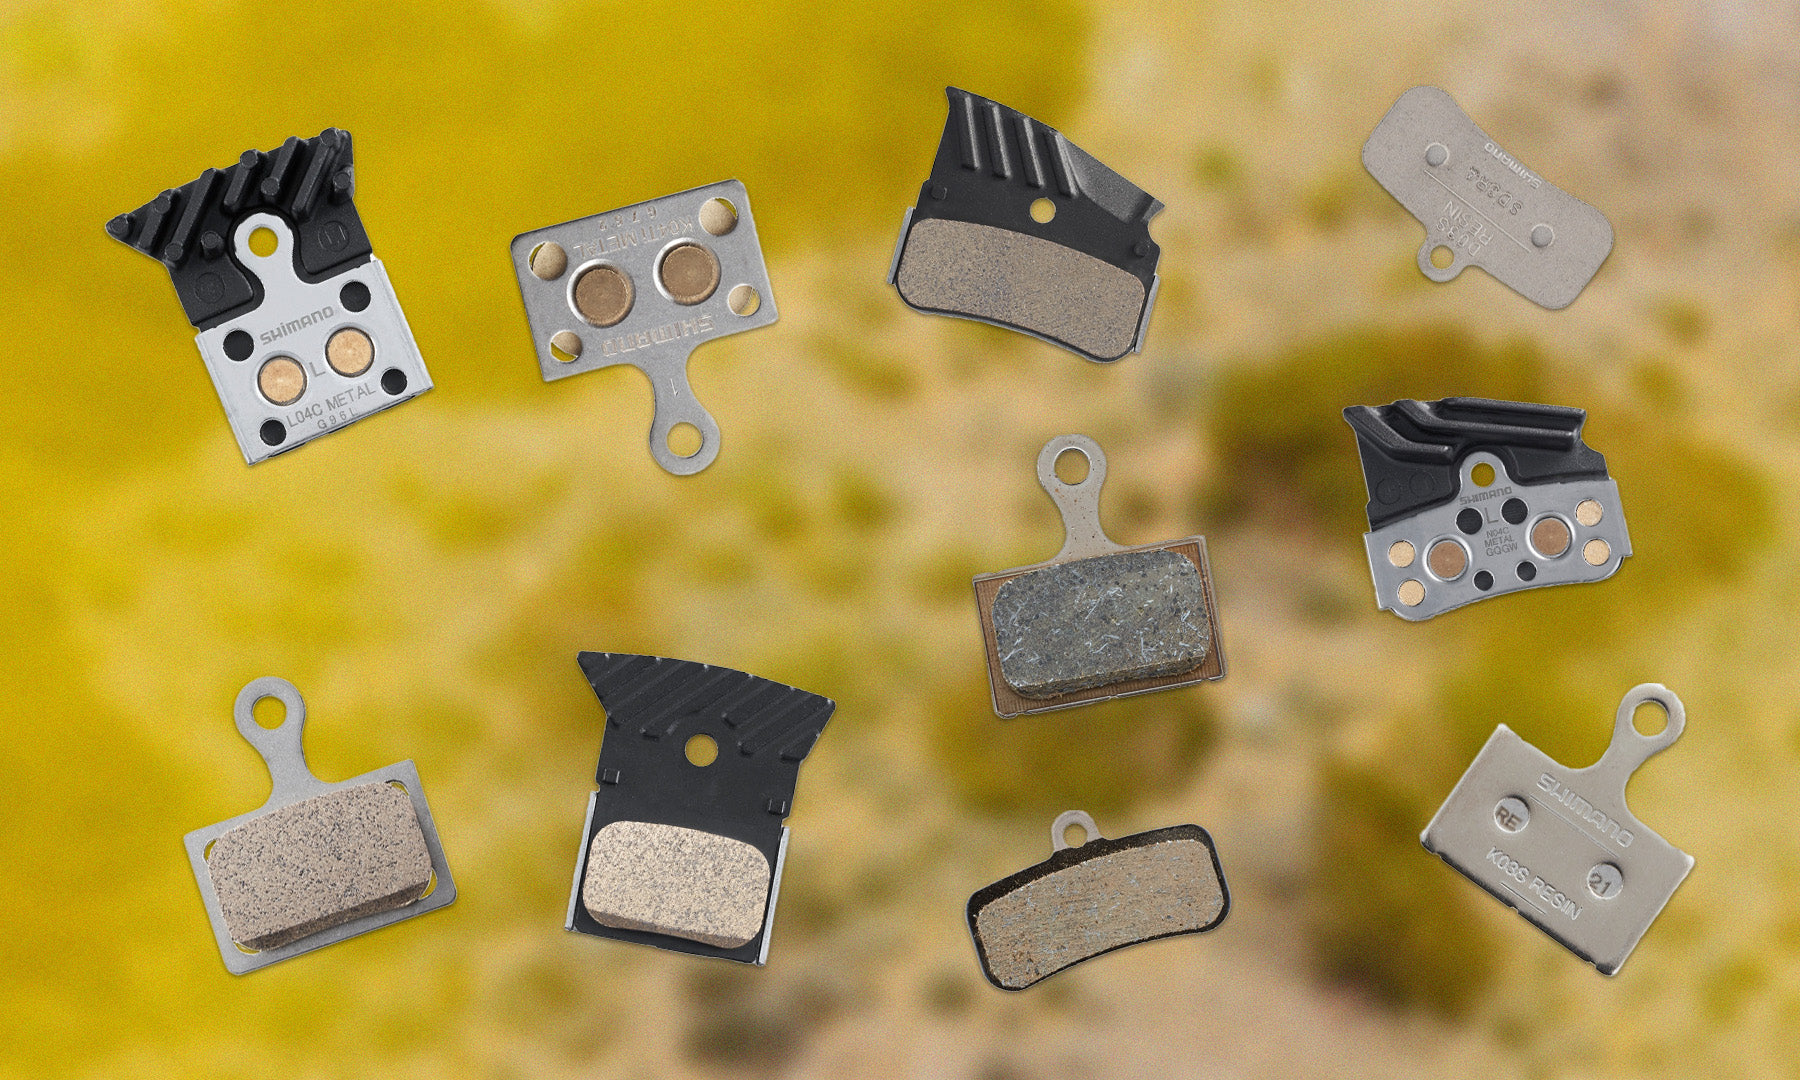
Brake rotor material
This is where things get tricky, and you are likely to run into a lot of marketing-speak. Rotors can be made out of steel, steel and aluminum, or even multiple metals sandwiched together. These combinations allow manufacturers to cut weight, increase performance, and reduce warping. But of course it’s more expensive to combine multiple metals than simply stamping a rotor from steel.
If you find yourself upgrading your rotor, you might be moving from a cheaper one-piece steel OEM rotor to a “floating” design (Like SRAM’s Centerline X models, SwissStop’s Catalyst, and Shimano’s Ice Tech line) in which the brake track is held in place by a central aluminum carrier that connects to the hub like spokes do in a wheel. Using a lighter material for the carrier allows rotor manufacturers to save a little weight and the stiff aluminum carrier helps prevent rotor warping. Because of the more complicated manufacturing process, these floating rotors are more expensive.
[product-block handle="sram-centerline-x-brake-rotor-160mm-6-bolt"/]
Shimano’s Ice Tech rotors, which are my go-to, are constructed with aluminum sandwiched between two layers of steel. This allows Shimano to cut a little weight, and improve heat management thanks to a finned aluminum layer which increases surface area and thus cools faster. On its most expensive XTR and Dura-Ace rotors, Shimano also adds a layer of heat dissipating paint. On high-end SRAM rotors, titanium bolts help shave weight on six-bolt models.
Resin only brake rotors
According to Murdick, some cheaper rotors are stamped “resin only.” These rotors “skip the heat treatment process at the factory to reduce cost.” Murdick says this makes them softer, and “If you use metal pads, you will likely have some horrible noise and extremely short rotor life.”
Generally these rotors are probably worth avoiding unless the budget is tight, if only because they also tend to be heavier and less well adapted to shedding heat.
Different brake rotor designs
Most rotors will have cutouts to help shed heat and allow mud and dirt to leave the braking surface. Some ultralight rotors will have larger cutouts along the braking surface. These also reduce rotational mass, making it a little easier every time you spin the wheel, but they also chew through pads a little more quickly. Rotors from big brands like Shimano, SRAM, and SwissStop can be very light (an XTR rotor weights 95g in 140mm for example) and tend to have a sensible braking surface that allows for mud to be cleared from the rotor while maintaining a decent pad life.
The UCI requires that rotors have an edge that is not 90 degrees. This won’t be a concern for most riders, and very few injuries have occurred after several years of pro road racing with disc rotors, but both Shimano and SRAM have a light bevel to their high-end road rotors to fulfill this requirement.
Anecdotally, I have found SRAM’s rotors to be a tiny bit thicker (0.05-0.1mm) than Shimano’s, but both seem to work well with the other brand’s calipers. If you are struggling to get enough spacing between your pads for a slightly thicker rotor, you can use the packaging to help space pads out a bit further. Simply place a clean business card over the rotor, insert it into the caliper, and then go ahead and align the pads as normal.
[button]Shop brake rotors[/button]
When do you change a rotor?
Rotors have a minimum thickness that is typically written on the side of the rotor. Measurements vary from 1.7mm to 1.5mm. Murdick says, "It can be tricky to measure this since the thinnest area will be in the middle of the brake track." If you are looking to buy a tool, “A micrometer works great but Vernier calipers often have depth gauge built in that can work as well.”
[product-block handle="park-tool-dc-1-digital-caliper"/]
Rotors don’t typically need to be replaced due to contamination, despite what you may have heard from your fellow riders. Given that high-end rotors often exceed $100 per pair, this is welcome news. Murdick says that in most cases they can be cleaned with lots of rubbing alcohol and clean paper towels.
“If a rotor becomes glazed, replacing it is the quickest fix but it is possible to wear through the glaze and bring the performance back," he said. "Soaking the brakes in very clean water and repeating the break-in procedure can remove a glazed surface fairly quickly. This seems to work by allowing the pad material dust to act like a polishing compound.”
Can you true a bent rotor?
In short, yes! And you might not even need the expensive tools that are often sold as rotor truing devices. However, according to Murdick, “It does take some skill and it’s possible to make it worse.” Murdick’s method uses nothing more than his bare hands and a clean rag. He says “ The biggest mistake new mechanics typically make is focusing too much on the brake track instead of the arms that radiate from the center. Bending the whole brake track over is only a good idea if that’s specifically what got bent out on the trail.” Instead, push gently on the arms to correct a warped rotor, using your brake pads as a truing guide. Remember some rotors can’t be saved, and if a part of the rotor is bulged out or badly folded over it’s time to buy a new one.
Bedding in and installing new rotor
Once you have a new set of rotors, remember to bed them in properly. Murdick says that a better term for the process would be “burnishing,” and that when a pad and rotor are being bedded-in, “pad material is being embedded into the rotor surface and the pad surface is also conforming to the shape of the rotor surface.” This improves braking and makes both pads and rotors last longer.
If mounting a six-bolt rotor, be sure to tighten the bolts diagonally opposite one another, rather than moving around the circle. Torque specs are generally listed in manuals, and can be quite low so they are worth checking. With Centerlock, tightening the lockring as you would a cassette is a good rule of thumb. Once your rotors are mounted, go ahead and realign your calipers. A new rotor might well be thick enough that your pads will rub if you skip this step.
With your new rotors selected, mounted, and bedded in, you’re ready to enjoy many months of better braking before you ever have to even think about rotors again.
[button]Shop brake rotors[/button]